A short Bag-Making Tutorial
by Jeff "Po Boy" Luke
Here I've taken my outer pocket, which I pre-marked using a 2mm two prong pricking punch, and punched four holes for keeper stitches to keep the piece aligned as I sew. When marking a piece, I always mark each hole using the previous, which keeps everything aligned along the scribe line I made previously with a stitch groover. The groover is used only to scratch the surface in this case, not to create an actual groove where leather is removed.
These two tools are what I use 95% of the time. As Bob Browder mentioned in the original post, a four prong punch will make marking and punching holes much quicker, but I find on smaller pieces with rounded corners the two prong works best for me. Here the pocket is held with the keeper stitches, I've punched about 1/3 of the holes and started stitching.
The key to consistent stitching is to always work from the "good" side, coming up through every hole at the same place in relation to the previous stitch. Always try to apply consistent pressure to both needles as you pull each stitch taught. You'll develop a feel for this over time, and figure out just how much pressure to use. If you torque down to hard, you'll end up with puckering, and a misshapen final result.
Close up of needle coming up from the back.
2/3 of the stitching is done, ready to punch and stitch the
last 1/3. I use artificial sinew for my keeper stitches, as it's relatively
cheap and I've got lots on hand. Another note on the keeper stitches: I always
punch four holes, using the center two for the stitch, again to prevent
distortion, as the stitch will draw up the hide somewhat.
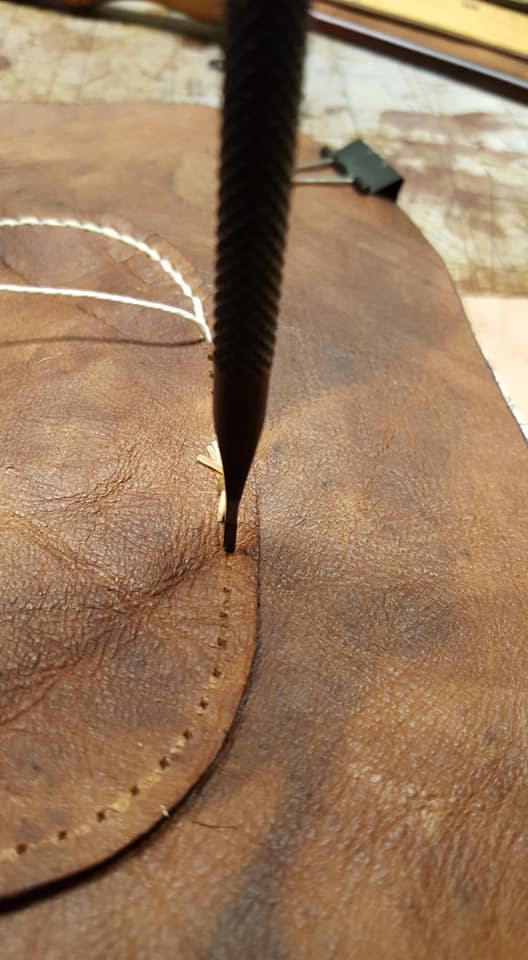
A little better view of the previously mentioned placement of the needle as it's pushed through the hole.
Here the first 1/3 is stitched. I always stop one hole short of the keeper stitch, as I find it tends to distort in those areas if I don't. I then punch the holes for another 1/3 or so, remove the keeper stitch, then start sewing again. Keeping your pricking prong perpendicular to the hide when punching the holes will also help with a consistent stitch in the end. It's all in the details.
2/3 of the stitching is done, ready to punch and stitch the last 1/3. I use artificial sinew for my keeper stitches, as it's relatively cheap and I've got lots on hand. Another note on the keeper stitches: I always punch four holes, using the center two for the stitch, again to prevent distortion, as the the stitch will draw up the hide somewhat.
Stitching is done. You can see I've doubled back on the last three stitches for added strength. I always do that at the beginning of a run as well, doubling up on the first two or three stitches.
Tag ends are cut just above the surface on the back side.
I left the thread natural in the first photos to better highlight the stitching, but here I've started to "paint" the thread using light brown Fieblings leather dye, which I often do just to ad a bit of additional patina, as the dye soaks into the holes and give a more natural, worn look to the final product.
I left the thread natural in the first photos to better highlight the stitching, but here I've started to "paint" the thread using light brown Fieblings leather dye, which I often do just to ad a bit of additional patina, as the dye soaks into the holes and give a more natural, worn look to the final product.
I always put a small drop of gel super glue on the tag ends on the back side just for a bit more insurance.
I've wiped off the excess super glue here. As you can see, with a little time and patience, the back side will look nearly as good as the outer stitching when complete.